Home Blog PowerPoint Tutorials How to Change Language in PowerPoint

How to Change Language in PowerPoint
People who require juggling multiple languages to suit their professional needs can often find a single language inadequate for their PPT and the interface. This might mean switching between the proofing language to check spelling and grammar, as well as the interface language to adjust it to editing needs. Below are instructions on how to change language in PowerPoint.
If you are a Google Slides user looking for this solution, please refer to our article on how to change language in Google Slides .
Should I change Proofing Language or Interface Language?
PowerPoint enables using multiple languages that you can switch between to match your presentation needs. Most commonly, users require to change the proofing language in PowerPoint, which means changing the grammar checker assigned language.
In case you are working at a remote location with a borrowed computer, you may be required to change the interface language of PowerPoint, as it would feel uncomfortable to locate menus or specific tools.
Check below for the instructions to change both the language interface and proofing language in PowerPoint.
How to Change PPT Language Interface in PowerPoint
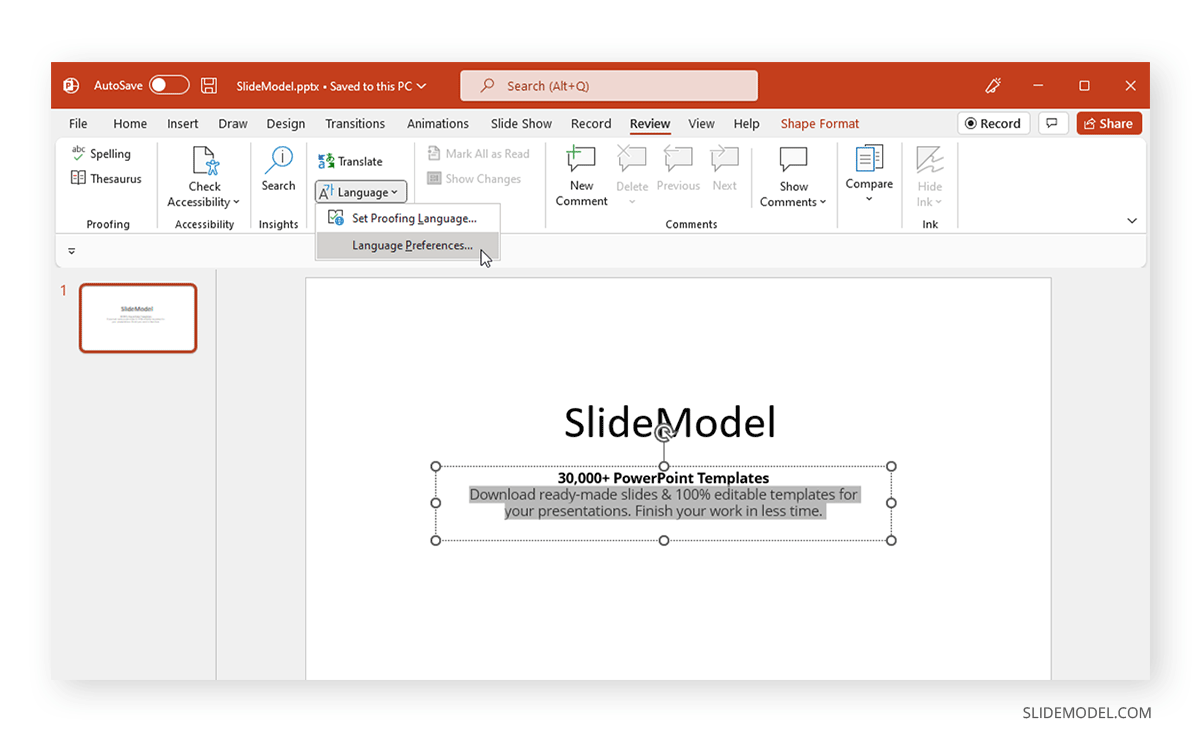
To change the language of the PowerPoint interface on a PC, go to Review > Language > Language Preferences .
Note: Follow the following instructions for other devices:
- Mac: If you are using Mac, you can change the interface language via the Apple menu from System Preferences > Language & Region .
- iPhone/iPad/Android: iOS and Android users, by default, will see the language set for their device as the default language in PowerPoint.
- PowerPoint for the Web: If you are using PowerPoint for the Web, it uses the same language as the host app of your documents, such as OneDrive, SharePoint, Dropbox, etc.
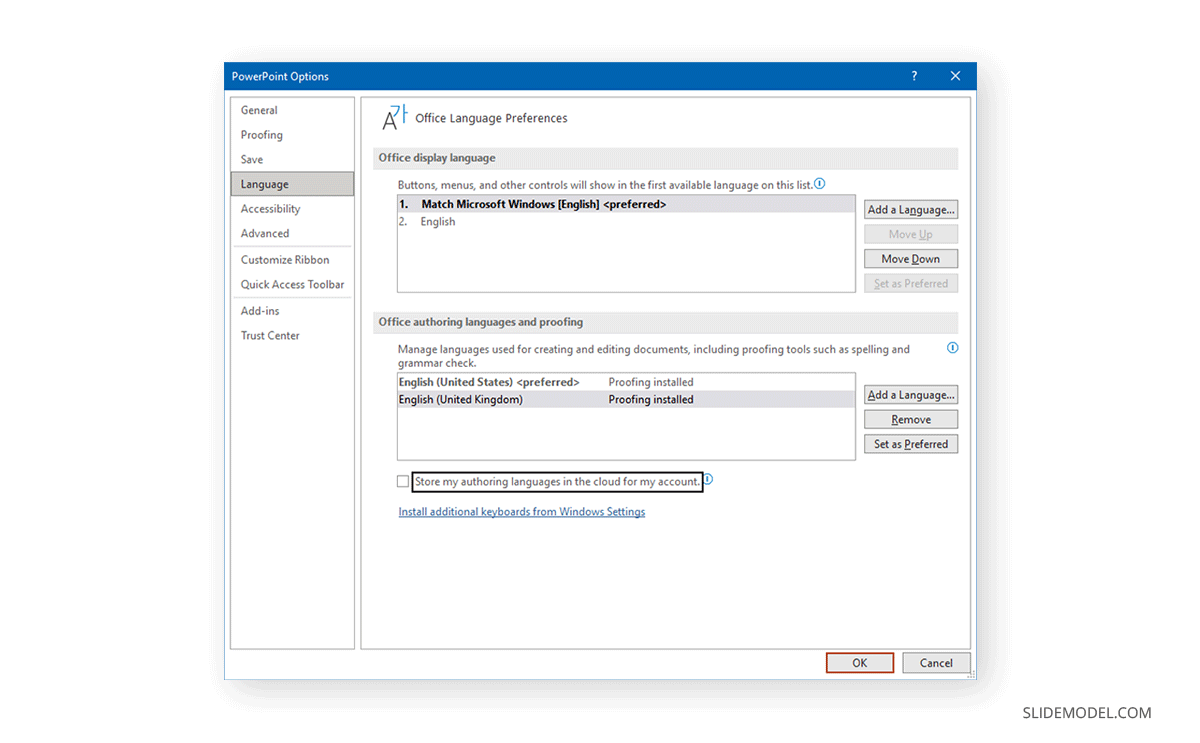
The Language Preferences option provides a menu from which you can choose the language you intend to use from the Office display language menu. The menu allows adding the new and preferred language and the one to be used if the text is unavailable for the primary language. To remove a specific language from the list, select it from the Office authoring languages and proofing menu at the bottom and click Remove .
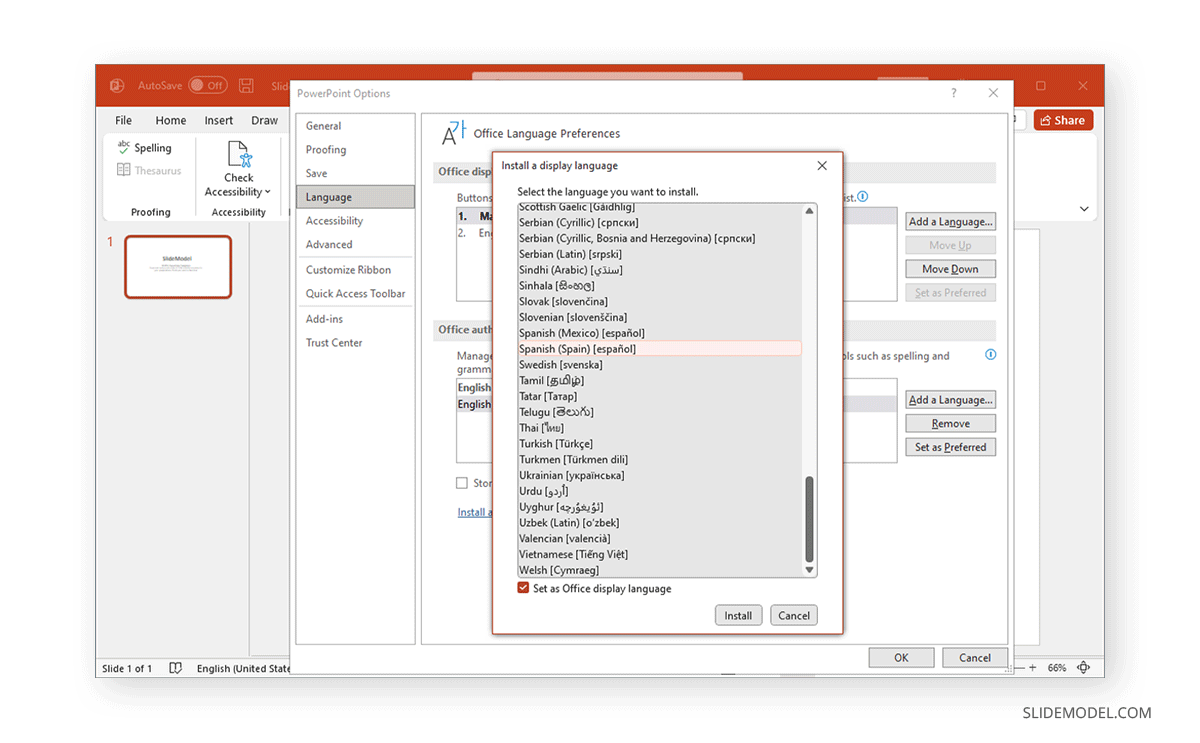
If you are installing a new language, it will take a few minutes before it is installed and ready for use.
You can switch between languages anytime by following the same steps and managing your preferred list for the interface.
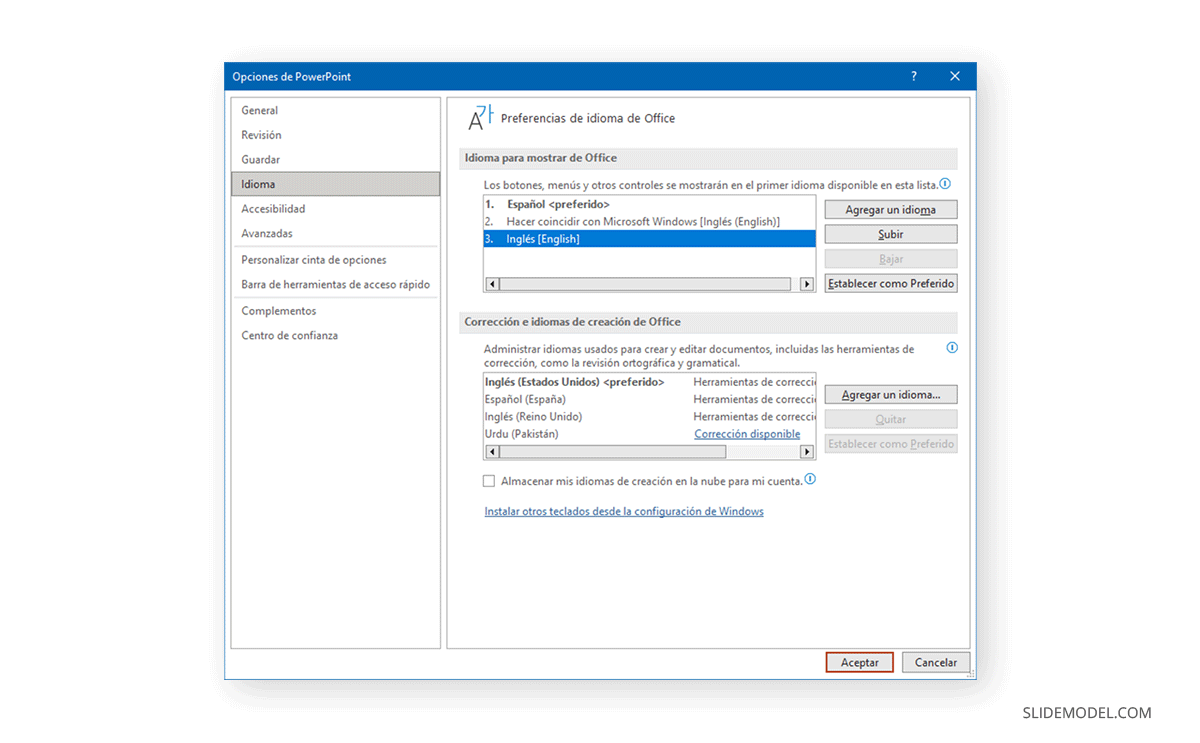
The selected language will become available for PowerPoint and other Office apps such as Word and Excel. The default preferences you set will also be applied across your Office apps.
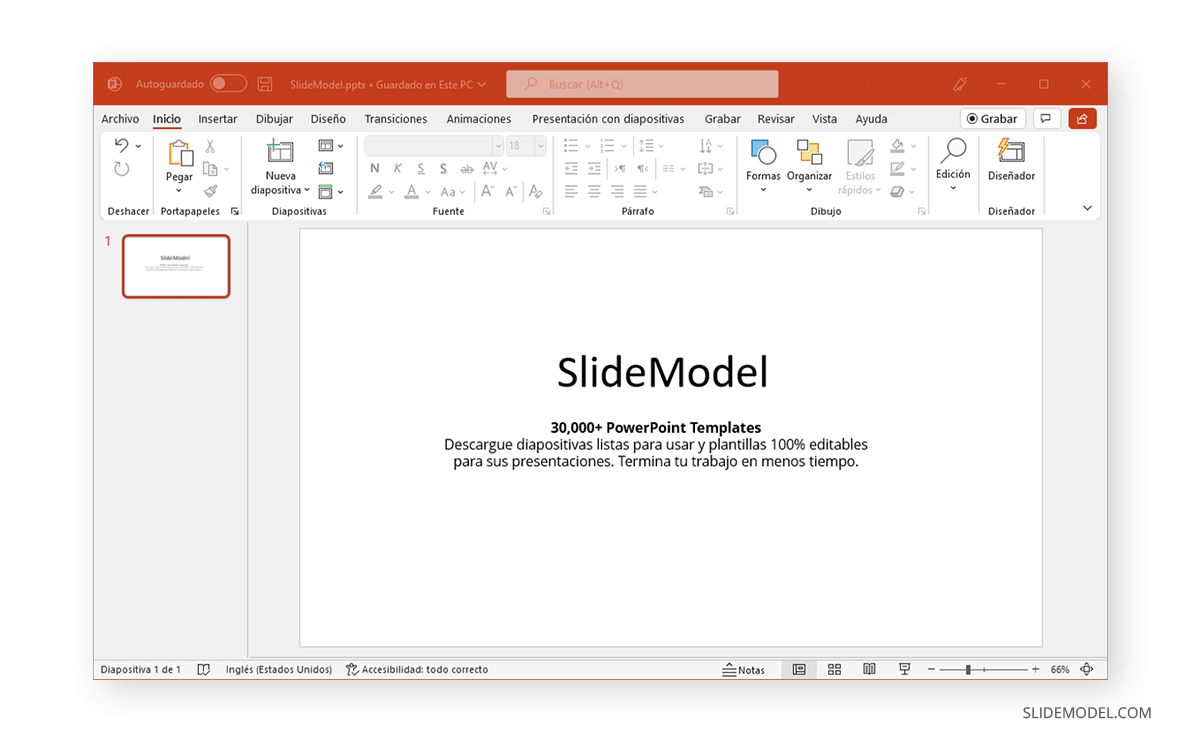
How to Change Proofing Language in PowerPoint
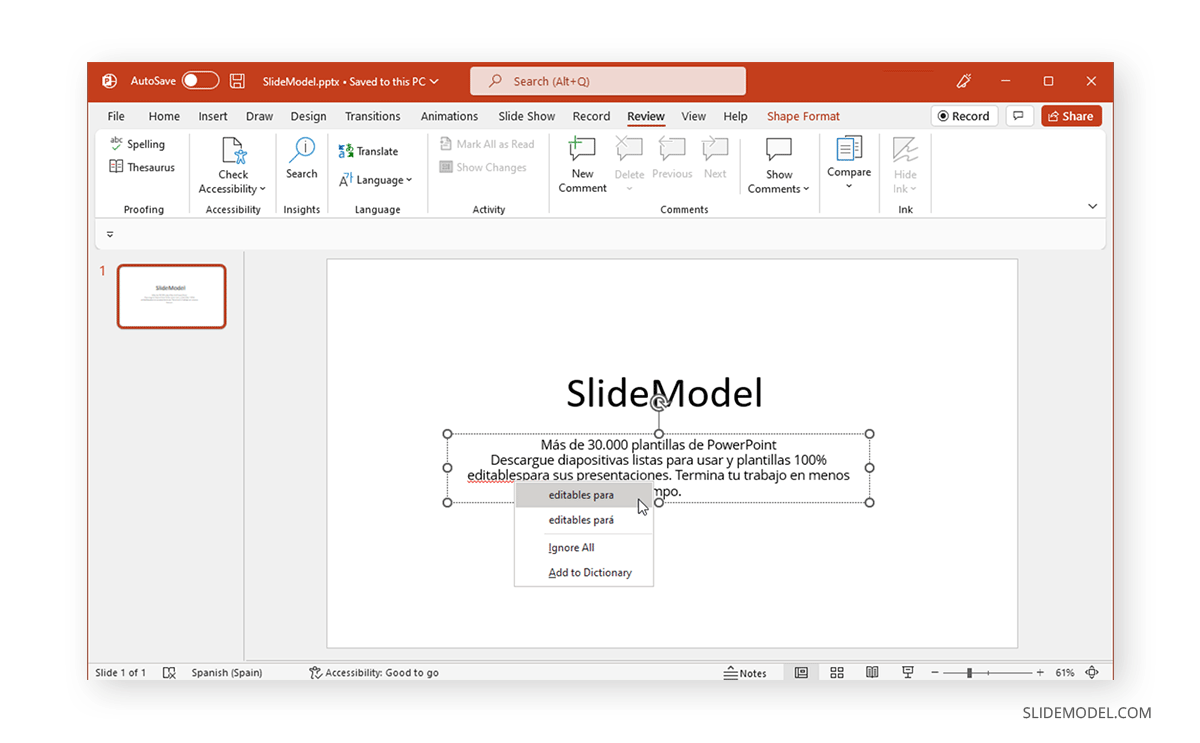
Whether you’re using PowerPoint on a PC or an Android or iOS device, you might have multiple keyboards installed to type in various languages when creating PPTs for different audiences. To set and change the proofing language, go to Review > Language > Set Proofing Language on a PC or Tools > Language on Mac. If you’re using PowerPoint for the Web, go to Review > Spelling & Grammar > Set Proofing Language .
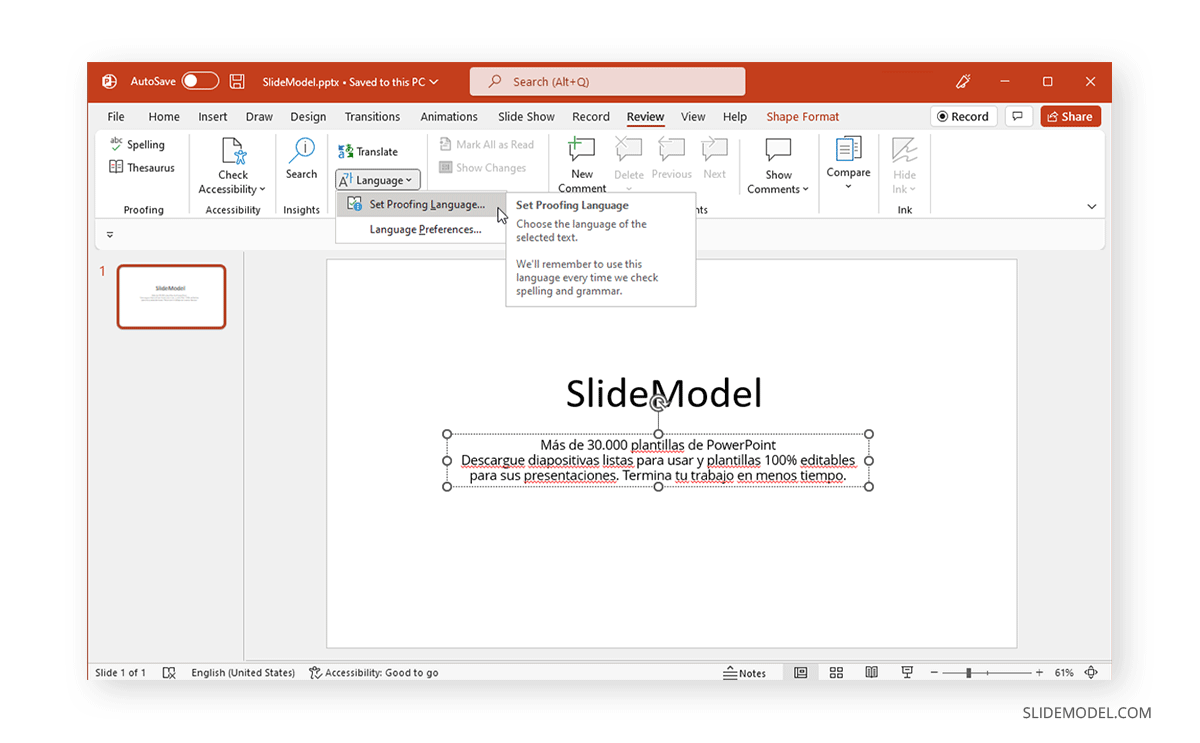
In the dialog box, select the language for checking spelling and grammar. When selecting a proofing language, you can also set a default language.
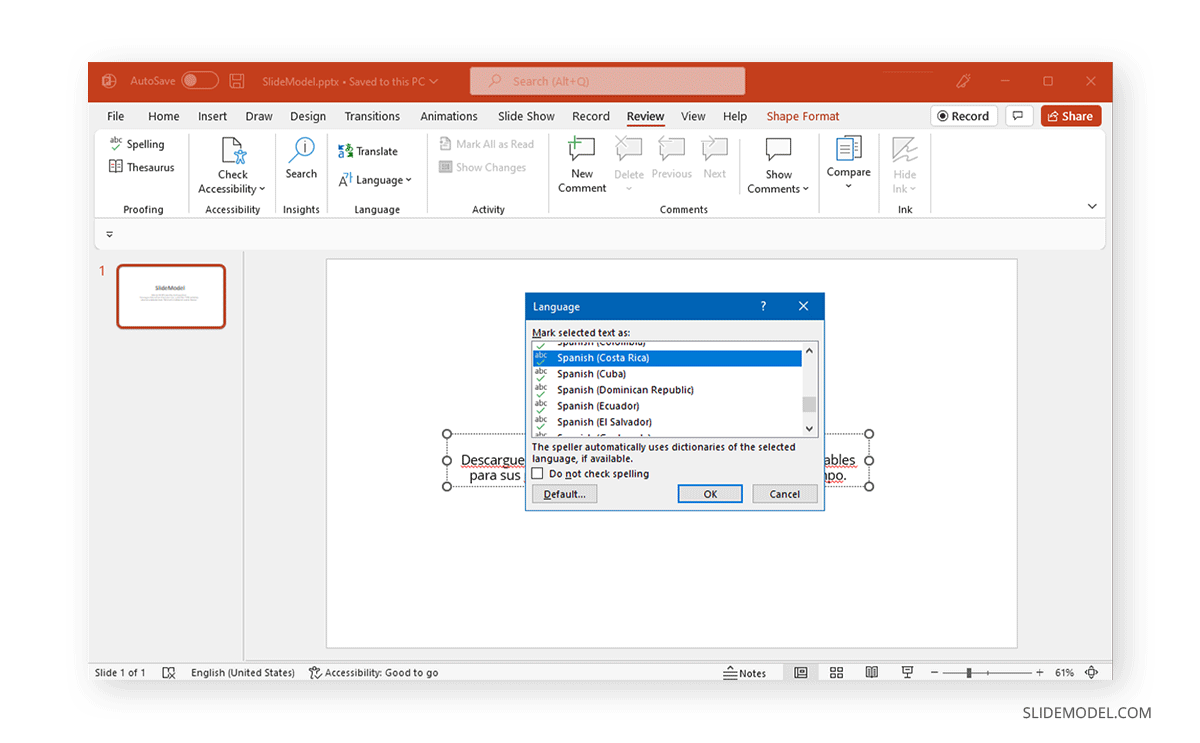
Once selected, PowerPoint will check the spelling and grammar in your desired proofing language. PowerPoint provides the utility to choose between specific languages and the version of the language preferred by the user (e.g., European or Latin American versions of Spanish). Also, check our article about how to check spelling in PowerPoint .
Like this article? Please share
Presentation Tips, Presentations Filed under PowerPoint Tutorials
Related Articles

Filed under Google Slides Tutorials • December 10th, 2024
How to Record a Presentation on Google Slides
Create powerful educational content by learning how to record a presentation on Google Slides. Ideal for webinars, lessons and more.

Filed under Business • November 18th, 2024
Fireside Chat: How it can Effectively Replace a Conventional Presentation
Learn about a creative method to hold meetings that can allow a much more closer relation with the audience. The Fireside Chat allows innovative formats for presentations and group gatherings.

Filed under Design • October 22nd, 2024
The Rules of PowerPoint Presentations: Creating Effective Slides
Create powerful slide decks by mastering the rules of PowerPoint presentations. Must-known tips, guidance, and examples.
Leave a Reply

How to Change Language in PowerPoint: A Step-by-Step Guide
Trish Dixon
Changing the language in PowerPoint is essential for creating presentations that are tailored to different audiences. Whether you’re preparing a presentation for a global team, editing slides for a different language group, or ensuring correct spell-check and grammar suggestions, adjusting the language settings in PowerPoint is straightforward.
In this guide, we will walk you through how to change the language in PowerPoint, covering text content, proofing tools, and interface language settings.
Why Change the Language in PowerPoint?
Changing the language settings in PowerPoint serves multiple purposes:
- Localization : Adapt your presentation to different languages to cater to a diverse audience.
- Spell Check and Proofing : Ensure that PowerPoint checks spelling and grammar in the correct language, reducing errors.
- User Interface Language : If you’re more comfortable with a different language, you can change the entire interface language for easier navigation.
Step-by-Step Guide to Changing Language in PowerPoint
Changing the language for text content.
This option allows you to set a different language for the text you type in your presentation.
- Select the Text : Open your PowerPoint presentation and highlight the text that you want to change the language for.
- Go to the Review Tab : On the top menu, click on the Review tab. This is where you’ll find options for proofing and language settings.
- Click on Language : In the Review tab, find and click on Language in the ribbon.
- Set Proofing Language : A drop-down menu will appear. Click on Set Proofing Language .
- Choose Your Language : A dialog box will pop up with a list of languages. Scroll down and select the language you want. Click OK to apply the changes.
- Repeat for Other Text : If you have multiple text boxes or slides, repeat the process for each one as needed.
Note : This change will apply to the selected text only. If you want the entire presentation in one language, ensure all text boxes are selected before following these steps.
Changing the Proofing Language for the Entire Presentation
If you want to set a language for all text in your presentation at once:
- Select All Text : Click on a slide and press Ctrl + A to select all text in that slide. You can also click outside the slide and press Ctrl + A to select everything.
- Follow the Steps in the Previous Section : After selecting all text, follow the steps mentioned earlier to change the proofing language. This will apply the chosen language to all selected content.
Changing the PowerPoint Interface Language
If you want to change the language of the entire PowerPoint interface (menus, buttons, and options):
- Open PowerPoint Options : Click on File in the top left corner, and then select Options from the drop-down menu.
- Go to Language Settings : In the Options window, select Language from the left-hand menu.
- Office Display Language : This changes the language of the PowerPoint interface.
- Office Authoring Languages and Proofing : This sets the language for text editing and proofing.
- Add or Set a Language : If your preferred language is not listed, click on Add a Language to choose one from the available options. Once added, select it and click Set as Preferred .
- Restart PowerPoint : After setting the desired language, you’ll need to restart PowerPoint for the changes to take effect.
Changing the Language for Specific Slides
If you’re creating a multilingual presentation, you may need to set different languages for different slides. Here’s how to do that:
- Select the Slide : Click on the slide where you want to change the language.
- Follow the Text Content Language Steps : Select all text in that slide by pressing Ctrl + A and follow the steps under “Changing the Language for Text Content”.
- Repeat for Other Slides : Move to the next slide and repeat the process.
Changing the Language of PowerPoint on Different Platforms
Follow the general steps outlined above. Windows users have the flexibility to change both the interface and proofing language.
The steps are similar but with slight variations:
- Go to Tools : Open your PowerPoint presentation and select the Tools menu at the top of the screen.
- Language : Choose Language from the drop-down menu.
- Select a Language : Pick your desired language and click OK .
- Restart PowerPoint : As with Windows, restart PowerPoint to apply interface changes.
On Mobile Devices (iOS and Android)
For mobile devices, PowerPoint uses the language settings of your device:
- Change Device Language : Go to your phone’s Settings and change the device’s language. PowerPoint will automatically adjust to this language.
- Proofing Language : To change the proofing language, select the text and follow similar steps as on desktop versions (limited to the available options in the mobile app).
Common Issues and Troubleshooting While Changing PowerPoint Language
- Language Not Available : If your desired language is not listed, it may not be supported by PowerPoint. Check Microsoft’s website for a list of supported languages or update your Office suite.
- Spell Check Not Working : Ensure that the correct proofing tools for your selected language are installed. You can download additional proofing tools from Microsoft’s official site.
- Interface Language Not Changing : If the interface language doesn’t change after you’ve followed the steps, make sure PowerPoint has been restarted. If the issue persists, try restarting your computer.
- Multilingual Presentations : If you’re working on a presentation in multiple languages, remember to set the correct proofing language for each slide or text box to avoid spelling and grammar errors.
Summary: How to Change Language in PowerPoint
Final thoughts.
Changing the language in PowerPoint is a simple but powerful way to ensure that your presentations are accessible, accurate, and professional for a global audience. Whether you need to switch languages for text content, proofing tools, or the entire interface, this guide provides all the steps necessary to make those changes across various platforms. Follow the outlined steps carefully, and you’ll be able to manage language settings in PowerPoint with ease.
Frequently Asked Questions
How do i change the language for text in powerpoint.
To change the language for text, select the text you want to modify, go to the Review tab, click on Language, and then select Set Proofing Language. Choose your desired language and click OK.
Can I change the language for the entire PowerPoint presentation at once?
Yes, you can change the language for the entire presentation by selecting all text (Ctrl + A), then following the steps to set the proofing language under the Review tab.
How can I change the PowerPoint interface language?
To change the interface language, go to File > Options > Language, choose your preferred display and proofing languages, set them as preferred, and restart PowerPoint.
Is it possible to set different languages for individual slides?
Yes, you can set different languages for individual slides by selecting the text on each slide and following the steps to change the proofing language.
How do I change the language in PowerPoint on a Mac?
On a Mac, you can change the language by going to the Tools menu, selecting Language, and choosing your desired language. Click OK to apply the changes.
What should I do if my desired language is not available in PowerPoint?
If your desired language is not available, check for updates or download additional proofing tools from Microsoft’s official site. If it still doesn’t appear, the language may not be supported by PowerPoint.
- Recent Posts
- How To View Two Slides Side by Side in PowerPoint? – December 17, 2024
- How to Apply Gradient to Shapes in PowerPoint: Expert Tips! – December 12, 2024
- How to Group Shapes in PowerPoint: A Step-by-Step Guide – December 9, 2024
2 responses to “How to Change Language in PowerPoint: A Step-by-Step Guide”
Good Information. TQ
Thanks! I am glad you liked it!
Leave a Reply Cancel reply
Your email address will not be published. Required fields are marked *
Save my name, email, and website in this browser for the next time I comment.
Latest Posts
How to view two slides side by side in powerpoint.
Learn how to view two slides side by side in PowerPoint using simple methods like Arrange All, split-screen, and dual monitors for easy comparison.
How to Apply Gradient to Shapes in PowerPoint: Expert Tips!
Learn how to apply gradient to shapes in PowerPoint with our easy step-by-step guide. Enhance your presentations using gradients for a professional look.
How to Group Shapes in PowerPoint: A Step-by-Step Guide
Learn how to group shapes in PowerPoint for easy editing, faster formatting, and consistent designs. Step-by-step tips to streamline your presentations.

Powerpoint Assist
Tips for Powerpoint by Regina Griffin

How To Change Language In PowerPoint
Looking to enhance your PowerPoint presentations by changing the language to better communicate with non-native speakers or customize your content for a specific audience?
In this tutorial by Regina Griffin, a teacher from Oregon, US, you will learn the step-by-step process of How To Change Language In PowerPoint.
From accessing language settings to avoiding common mistakes, this article will provide you with valuable tips and tricks to ensure a seamless language transition in your presentations.
Let’s dive in!
Key Takeaways:
- Communicate effectively with non-native speakers using different languages in your PowerPoint presentation.
- Customize your presentation for specific audiences by changing the language settings in PowerPoint.
- Ensure accuracy in translations by using a language dictionary and checking for language-specific fonts and symbols.
Why Change Language in PowerPoint?
Changing language in PowerPoint can be essential for effective communication with diverse audiences and ensuring your message resonates with non-native speakers.
When you customize the language in your PowerPoint presentation, you open up avenues for better audience engagement. By speaking to people in their preferred language, you demonstrate respect for their identity and enhance inclusivity within your presentation. This thoughtful gesture can significantly impact how your message is received, leading to increased comprehension and retention among viewers. Using different languages can help you convey complex ideas more clearly, making your content accessible to a wider range of individuals.
Communicate with Non-native Speakers
One of the primary reasons to change language in PowerPoint is to effectively communicate your message with non-native speakers, ensuring clarity and understanding.
Making presentations accessible to a global audience involves more than just visual aids. Language plays a crucial role in connecting with diverse viewers. By adjusting the language settings in your slides, you can break through communication barriers and foster deeper engagement.
For non-native speakers, language customization demonstrates respect for their backgrounds and acknowledges their importance in the conversation. This attention to detail can significantly enhance their overall experience and improve comprehension of the content being shared.
Customize Presentations for Specific Audiences
Changing the language in PowerPoint allows one to tailor their presentation to a specific audience, enhancing relevance and engagement.
By customizing your presentation through language changes, you can better resonate with the audience, making the content more relatable and impactful. When presenting in a language familiar to the audience, you demonstrate respect for their culture and preferences, fostering a deeper connection. This level of personalization showcases your attention to detail and commitment to effective communication. Cultural sensitivity plays a crucial role in ensuring that your message is received positively, avoiding any misunderstandings or misinterpretations.
How to Change Language in PowerPoint
Changing the language in PowerPoint involves simple steps to adjust the proofing language , text , and user interface to meet your specific language requirements .
To start, open your PowerPoint presentation and navigate to the ‘File’ tab in the top-left corner. Next, click on ‘Options’ in the drop-down menu. This will open the PowerPoint Options dialog box. In the options window, locate and select ‘Language’ from the left-hand menu.
Here, you can customize the proofing options such as spelling and grammar checking . You can also change the display language for commands, buttons, and tabs within PowerPoint to match your preferred language . Once you have made your desired changes, click ‘OK’ to save your new settings.
Step 1: Access the Language Settings
To change the language in PowerPoint, the first step is to access the language settings through the ‘Review’ tab and select the desired language option.
Once you have launched PowerPoint, navigate to the ‘Review’ tab located in the top menu bar. Click on the ‘Review’ tab to reveal a range of options. Look for the ‘Language’ or ‘Language Settings’ option, as it varies slightly depending on the version of PowerPoint you are using.
Upon clicking on the language settings, a drop-down menu will appear, presenting you with a list of available languages. Take your time to select the language that you feel most comfortable working in, taking into consideration your audience and the overall design aesthetics of your presentation.
Step 2: Select the Language You Want to Use
Once you access the language settings, choose the language you want to use from the list provided by Microsoft PowerPoint.
Choosing the correct language in PowerPoint is essential as it directly impacts how your content is displayed and understood by your audience. Selecting the appropriate language ensures that spell checks, grammar corrections, and language-specific formatting options are accurate. It also helps in maintaining consistency across your presentation.
Whether you need to present in English, Spanish, French, or any other supported language, PowerPoint offers a wide range of options to cater to your specific needs.
Step 3: Change the Default Language for New Presentations
To ensure consistency, consider changing the default language for new presentations in PowerPoint by adjusting language settings in the menu.
When you set the default language for new PowerPoint presentations, you establish the preferred linguistic foundation for your content creation. This ensures that all text boxes, shape descriptions, and notes use the selected language as the primary reference for grammar and spell-checking.
By navigating to the ‘Options’ or ‘Preferences’ menu in your PowerPoint application, you can access the ‘Language’ settings. Here, you will find a list of available languages to choose from, allowing you to select the one that best aligns with your content requirements.
Step 4: Change the Language for Existing Presentations
For existing presentations, you can easily change the language by accessing the language settings and updating the text language to align with your requirements.
To modify the language settings in PowerPoint, follow these simple steps:
- Open your presentation.
- Navigate to the ‘Review’ tab in the menu bar.
- In the ‘Language’ group, click on the ‘Language’ option.
- A drop-down menu will appear, allowing you to select the desired language for your presentation.
By changing the text language, you ensure that spell check and other language-specific features work accurately. Consistency in language usage across your slides is crucial for maintaining professionalism and conveying your message clearly to your audience.
Tips for Changing Language in PowerPoint
Enhance your language-changing process in PowerPoint with these valuable tips to ensure accurate translations and seamless language adjustments.
Utilize language dictionaries to ensure the correctness of translated text and proper use of language-specific terms. Check for language-specific fonts to maintain consistency and readability across different languages.
It’s also helpful to create test presentations to practice language changes and identify any potential issues beforehand.
By incorporating these strategies, you can streamline the process of changing languages in PowerPoint and enhance the overall quality of your presentations.
Use a Language Dictionary for Accurate Translations
When changing languages in PowerPoint, consider using a reliable language dictionary for precise translations and language accuracy.
Language dictionaries play a pivotal role in ensuring that the text and content of your PowerPoint presentation are accurately translated from one language to another. These resources provide comprehensive lists of words, phrases, and expressions in multiple languages, helping you avoid potential errors or misinterpretations.
By referring to trusted sources such as bilingual dictionaries, online language tools, or professional translation services, you can enhance the quality and clarity of your presentation. It is imperative to prioritize precision in language usage to effectively convey your message and connect with a diverse audience.
Check for Language-specific Fonts and Symbols
Before finalizing language changes, ensure to verify language-specific fonts and symbols to maintain consistency and visual appeal in your PowerPoint presentation.
Language changes in a PowerPoint presentation can significantly impact how your content is perceived. When transitioning between languages, visual elements should remain seamless to ensure clarity for viewers. Consistency in font choices and symbols is crucial in upholding the professional look of your slides across different linguistic contexts. Remember that design elements play a crucial role in enhancing the overall message you wish to convey.
By paying attention to these details, you can elevate the visual impact of your presentation and leave a lasting impression on your audience.
Practice-Changing Language in a Test Presentation
To ensure a smooth language transition, practice changing language settings in a test presentation to familiarize yourself with the process and avoid errors in your main presentation.
By dedicating time to test out different language styles and changes in PowerPoint, you can increase your familiarity with the tools available to you, dampening the chances of making mistakes in crucial situations. This rehearsal not only serves as a preventive measure against errors but also contributes to boosting your confidence when using the software. Remember, repetition is key in mastering any skill, so don’t hesitate to run through a few trial presentations to refine your language transition process.
Common Mistakes When Changing Language in PowerPoint
Avoid these common mistakes when altering languages in PowerPoint to ensure a seamless transition and maintain content compatibility across presentations.
One of the most prevalent errors made by individuals when changing languages in PowerPoint is forgetting to save the adjustments, resulting in all modifications being lost once the program is closed.
Selecting the incorrect language setting can cause confusion and misinterpretation of text, impacting the overall message of the presentation.
To prevent such issues, always double-check the language settings before making any changes and save the presentation frequently to safeguard against any data loss.
Not Saving Changes
One common mistake when changing languages in PowerPoint is forgetting to save the language settings, resulting in potential inconsistencies in future presentations.
When you switch the language settings in PowerPoint to suit your audience or collaborators, it’s essential to remember that these changes need to be saved. Failing to do so can lead to errors in formatting and even misunderstandings during your presentation. To avoid this issue, always make sure to save the language preferences after customization by navigating to the File tab and selecting Save or Save As . This simple step ensures that your language modifications are retained, facilitating seamless communication and maintaining the integrity of your content.
Choosing the Wrong Language
Selecting the incorrect language during the change process can lead to confusion and miscommunication in your PowerPoint presentations, emphasizing the need for accurate language selection. In terms of PowerPoint presentations, the choice of language can significantly impact how your message is conveyed.
Language verification
plays a crucial role in ensuring that your content is not only clear but also culturally appropriate for your audience. Incorrect language selection can result in your message being misinterpreted, leading to potential misunderstandings and even professional embarrassment. Therefore, it is vital to pay close attention to the accuracy of the language chosen, considering nuances, grammar, and the overall tone to effectively convey your ideas.
Not Checking for Language Compatibility
Failing to verify language compatibility across different PowerPoint features and content elements can result in formatting issues and inconsistencies within your presentations.
When the language settings are not aligned, it can lead to text misplacements, altered fonts, or even characters showing up as boxes or question marks – creating a puzzling experience for your audience. Ensuring that the fonts you use are applicable and that the language support is consistent will guarantee that your message is conveyed clearly and professionally. Mismatched language settings can disrupt the overall design flow, affecting the visual appeal of your slides and detracting from the quality of your presentation.
Mastering language changes in PowerPoint is vital for effective communication, audience engagement, and presentation customization to cater to diverse language needs.
Customizing the language in PowerPoint allows presenters to tailor their message to different audiences, making it more relatable and comprehensible. By adjusting the language settings, presenters can enhance user engagement and ensure the message resonates effectively. This customization feature not only aids in better communication but also reflects respect for diverse linguistic backgrounds among viewers, fostering a more inclusive environment. These language adjustments help break down language barriers, ensuring clarity and optimizing the overall presentation impact.
For further information on language customization in PowerPoint and related topics, refer to the following resources and references provided.
In terms of tailoring the language settings in Microsoft PowerPoint, users have a multitude of options at their disposal. Whether you need to adjust display languages, proofing settings, or language preferences on a slide-by-slide basis, understanding how to navigate these features can significantly enhance your presentation delivery.
By exploring Microsoft’s official support documentation , attending online tutorials by expert presenters, or engaging with PowerPoint communities on platforms like Reddit or TechNet, users can delve deeper into the nuances of language customization. Effectively maneuvering these settings not only personalizes your presentations but also helps you communicate with diverse audiences more effectively.
Frequently Asked Questions
1. how do i change the language in powerpoint.
To change the language in PowerPoint, go to the “File” tab and select “Options” from the menu. In the “Powerpoint Options” window, click on “Language” in the left sidebar. From there, you can choose your desired language from the dropdown menu and click “Set as Default” to save the changes.
2. Can I change the language for just one slide?
Yes, you can change the language for individual slides. Simply select the slide you want to change, then go to the “Review” tab and click on “Language” in the “Proofing” section. From there, you can choose your desired language for that specific slide.
3. What if the language I need is not listed in the options?
If the language you need is not listed in the options, you can click on “Add additional editing languages” at the bottom of the list. This will take you to the Microsoft Office Language Preferences, where you can download and install the language you need for PowerPoint.
4. Can I change the language for the entire presentation?
Yes, you can change the language for the entire presentation by going to the “Review” tab and selecting “Language” in the “Proofing” section. From there, click on “Set Proofing Language” and choose your desired language for the entire presentation.
5. Will changing the language affect the formatting of my presentation?
No, changing the language in PowerPoint will not affect the formatting of your presentation. It will only change the language used for spell check and grammar check.
6. How can I tell which language is currently being used in my presentation?
To see which language is currently being used in your presentation, go to the “Review” tab and click on “Language” in the “Proofing” section. The current language will be listed at the top of the dropdown menu.
Similar Posts
How to change margins in powerpoint for printing.
Looking to enhance the visual appeal of your PowerPoint presentation when printing it out? Changing margins can help you fit more content on a slide and create a more professional look. In this tutorial by Regina Griffin, a teacher from Oregon, US, you will learn how to easily change margins in PowerPoint for printing. From…
How To Group In Powerpoint
Are you looking to enhance your PowerPoint presentations with organized and visually appealing elements? Grouping in PowerPoint is a powerful tool that can help you achieve just that. In this article, we will explore the definition of grouping in PowerPoint, its benefits, and step-by-step instructions on how to group objects. We will also discuss tips…
How To Create A Flowchart In PowerPoint
Have you ever wondered what a flowchart is and how it differs from a diagram? In this article, we will explore the world of flowcharts and why they are a valuable tool for presentations in PowerPoint. From the different types of flowcharts to the steps on how to create one, we will dive into the…
How To Link Chart In PowerPoint From Excel
Are you tired of manually updating charts in PowerPoint every time your data changes in Excel? Look no further! Explore the benefits of link charts in PowerPoint from Excel. From saving time and effort to ensuring accurate data, linking charts can streamline your workflow. Follow our step-by-step guide to easily link your charts, troubleshoot common…
How To Change The View In PowerPoint
Are you looking to enhance your PowerPoint presentations and make them more engaging? Changing views in PowerPoint can help you achieve just that! In this tutorial by Regina Griffin, a teacher from Oregon, US, we will explore the various reasons why Change The View is important, how to do it using both the View tab…
How To Rotate Slide In PowerPoint
Want to enhance your PowerPoint presentations? One simple way to add visual interest, emphasize key points, and improve information flow is by rotating your slides. In this article, learn how to rotate slides in PowerPoint using methods like the rotate handle, rotate options in the format tab, and rotate animation feature. We also share tips,…

IMAGES